 |
| Can't connect to a wifi hotspot after upgrading your Apple device to iOS 9? Here is the solution |
Apple released its latest mobile operating system last month.
iOS 9 brings a number of new features to your Apple iPhone, iPad or iPod Touch, including a smarter Siri and completely redesigned App Switcher.
However some users have complained about a number of problems with the operating system – including the infamous new Wifi Assist option and an annoying Bluetooth glitch.
Apple fans have also complained about issues with wifi connections following the free update.
If your iPhone, iPad or iPod Touch is having trouble connecting to your wifi hotspot or is taking longer to connect – this could be the fix.
First things first – swipe up on the Home Screen to access your Control Centre panel.
| Turning on Airplane Mode for a few seconds can be enough to successfully reconnect to a wifi hotspot |
Wait for a few seconds for the iPhone or iPad to disconnect from all of your wireless connections, and then tap the icon again to disable it.
Your device will then reconnect to all of your wireless connections and will (fingers crossed) iron out all of your wifi woes.
 |
| Renew the Lease of your current connection to give your wifi a nudge in the right direction |
It does not involve reseting any of your system preferences or wifi options.
Simply navigate to Settings > Wi-Fi and then tap on the small "i" icon next to your current network.
Scroll to the bottom of the window that opens and tap the Renew Lease button at the bottom of the form.
And that's it.
 |
| Disconnecting from your wifi network and starting again from scratch can solve your wifi woes |
It's a simple solution but is usually pretty effective.
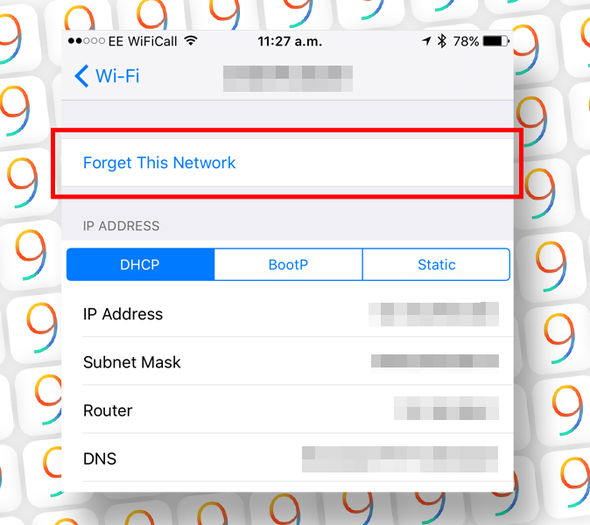
To Forget and Reconnect to a wifi connection on iOS 9, navigate to Settings > Wi-Fi.
Pick your chosen wifi connection and then tap on the small "i" icon next to the name of the connection, then tap Forget This Network, which sits at the top of the network page.
Then return to the Wi-Fi main menu, find your chosen hotspot and then reconnect from scratch (you'll need your password).
 |
| Wifi Assist could be switching between your home wifi and mobile data behind your back |
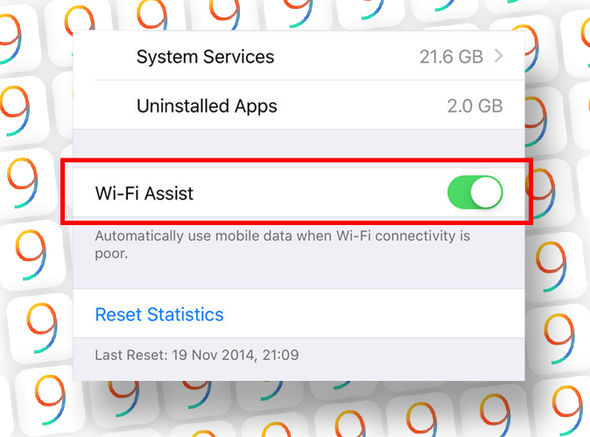
Apple included this feature – dubbed Wifi Assist – by default with iOS 9.
It's designed to ensure you are never without a strong internet connection, but can also burn through your monthly mobile data allowance.
To disable the new feature, navigate to Settings > Mobile Data and then scroll to the bottom of your installed apps.
Toggle the Wifi Assist button to turn off the new feature.
 |
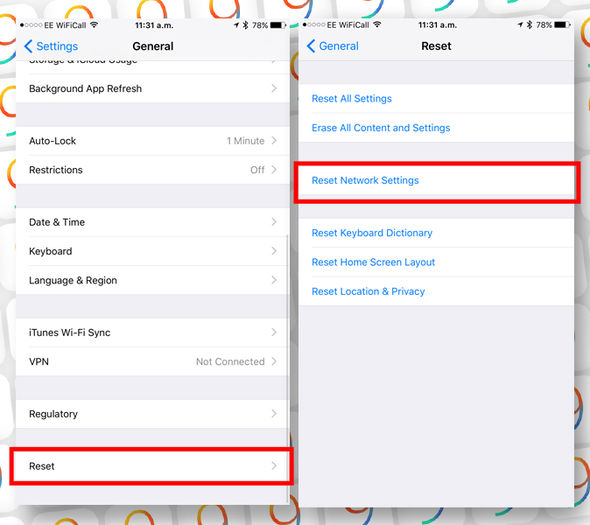
| Reset Your Network Settings is a drastic step but might solve all of your iOS 9 wifi troubles |
To reset the network navigate to Settings > General > Reset and tap Reset Network Settings.
Domain Name System, or DNS, is the internet server which translates domain names like express.co.uk to IP addresses – the numerical sequence of digits that locates servers across the web.
Your Internet Service Provider, or ISP, will have its own DNS server that will be used by default by all of the devices connected to your network.
However these can sometimes be slow and clogged with the thousands of DNS lookups being requested.
Fortunately there are some alternatives to your DNS.
US technology firm Google operates a complimentary DNS service that promises speed, security and performance.
Another alternative is Open DNS.
To change your DNS settings navigate to Settings > Wi-Fi and then tap the "i" next to your current connection.
Scroll down until you see the DNS form in the chosen connection's setting and tap on the numbers to the right.
Your iOS 9 keyboard of choice will then appear and allow you to change the numbers.
Enter the alternative DNS server you want to use.
To use Google’s DNS use either of these addresses in the field, 8.8.8.8 or 8.8.4.4
For Open DNS, type in 208.67.222.222 or 208.67.222.220
Now that your iDevice is up and running – why not read the NewsNewsBlog.blogspot.com guide on the best tips and tricks to master iOS 9?

Post a Comment Blogger Facebook Disqus